know what others are searching on the web?

Are you interested in knowing what others are searching on the Google? or what the current hot topic of search is?

Thanks to Google trends you can now find out what your peers in India are searching on the web, that too on hourly basis.

Google unveiled two new India centric services - Google trends and Google Hot Trends.

What’s on our collective mind as we search for information? What’s interesting to people right now? Hot Trends will tell you. At a glance, you’ll see the huge variety of topics capturing our attention, from current events to sports to political issues to the latest Bollywood gossip. Hot Trends aren’t the search terms people look for most often; those are pretty predictable, like [weather] or [games]. Instead, the Hot Trends algorithm analyzes millions of searches to find those that show an unusual and fairly sudden increase in popularity. The outcome is the Hot Trends list. Hot Trends is updated throughout the day, so check back often.

To give it a test run I looked at hot trends for last 7-8 days. Not only was it fun, but quite informative too. Here is the snapshot of top 5 searched keywords for last 7 days.

On January 31st, the Reliance Power issue had closed and most of the people were trying to see the IPO allotment status, so those keywords ruled the top 5 searches.

The next day (Feb 1st), top searched key phrase was dominated by students searching for University results declared on RGUHS website followed by people searching for Reliance power allotment status.
Ditto was on Feb 2nd and Feb 3rd too.

Feb 6th saw users getting into valentine mood with couple of top 5 searched keywords were related to that. Kashmir University was another searched word - Again students searching for their website for checking their online results

Till Feb 14th searches like “Rose Day” or “Valentine gifts” will rule the top searched keyword on google trends !

One interesting thing to note, Indian students are hooked onto internet. On all days university / school related searches had at least 20-25% of search share.
Next generation contextual advertising delivery through speech recognition technology

Microsoft is leaving no stones unturned to increase its currently miniscule market share in lucrative online advertising space.

It recently unveiled new contextual analysis and ad targeting solutions for online video content at the fourth annual adLabs Demo Fest at Microsoft’s headquarters. The Contextual Ads for Video offering uses speech recognition technology to translate the audio from online clips into text, which can then be matched to deliver targeted ads to the users.

The algorithm used by Microsoft can differentiate between speakers (in the video) and even their conversations, parse the context of what’s being said, and use that data to deliver highly contextual ads to the users.

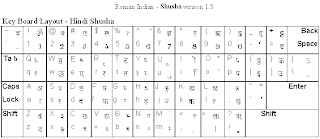
KEYBOARD HELP FOR TYPING In Hindi WITH SHUSHA FONTS

KEYBOARD HELP FOR TYPING In Hindi WITH SHUSHA FONTS

More Keystrokes

Press Alt, and keeping Alt pressed,

For Chandrabindu: Alt and 0208
For comma: Alt and 0130
For small dash: Alt and 0150
For long dash: Alt and 0151
For Question mark: Alt and 0198
For Exclamation mark Alt and 0209
For 3 dot "..." Alt and 0133

How To Create A Hindi Blog on Blogger (Chnge In settings)

First of all you must have a blog or you have to create a blog on Blogger. if you don’t have one Click here to read Step by step process of how to create a blog in Blogger

Step 1 Configuring Windows XP PC To Take Unicode Hindi

Step 2: Click Start > Control Panel.

Step 3: From Control Panel Open “Regional and Language Options” By Clicking on it.

Step 4: Regional and Language Options dialogue box will be appeared on the screen. Click “Language” tab.

Step 5: Check “Install files for complex script and right-to-left languages (including thai) Check box.

Step 6: A meesage box will be appeared on the screen, read the message and press “OK” button and then press “Apply” Button. System will ask to insert a Windows XP installation CD into CD-ROM drive and then press “OK” Button. Windows XP will install necessary files to hard disk and then reboot the machine.

Step 7: After rebooting the machine start Control Panel then click “Regional and Language Options”.

Step 8: click “Language Tab” and Click Details > Add button.

Step 9: Add Input Language Dialogue box will be appeared on the screen. Choose “Hindi” from Input Language drop down list box and then press “Ok” Button. It will add Hindi Language.

Step 10: Press “Ok” button to close all open windows.

Step 11: Now you may see Language Bar will be added to the taskbar as shown below.

Step 12: Now by clicking on language toolbar you can change the language, Choose “Hindi” from language toolbar to start writing Hindi in Windows XP machine. (Shortcut to switch between language is (Left Alt + Left Shift )

Step 13: Click on the language toolbar and choose “Show the language bar”, language toolbar will be shifted to top right portion of the desktop.

Step 14: Open any text editor and start typing in Hindi language. For this you must know the keyboard layout(Hindi). If you downt know then click here => KEYBOARD HELP FOR TYPING In Hindi

Step by step process of How to create a blog in Blogger (2)

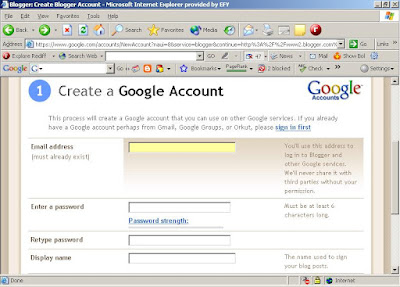
Step 8: If you don’t have a Google account then you have to create one. For this you have to fill the form as shown above type in your Email address. You must have an email address then Enter a password and Retype your password. Your password must be at least 6 characters long. Password and Retype password must be same. Now type in your Display name. This name will be used as a signature of post. Type in Verification word in the given text box. Then read the terms of service by clicking “Terms Of Service” link. If you agree with the terms of service then check the “I accept terms of service” check box. Then click “Continue” button to continue the blog creation process.

Name your blog:
Step 9: Now you will be shown second step to create a blog that is Naming a blog. So you must think an appropriate a blog title and blog URL beforehand.
Just suppose blog name is “Unique Technology Blog” and blog address (URL) “unicomtech”. Type in there your Blog name and Blog URL and click “check availability” link. It is for just checking that somebody has already taken this URL or not.
If it is available then you can proceed further, and if is not then type in some other URL.
Step 10: If you want to host your blog somewhere else then Click “Advanced Blog Setup” link else click “Continue” to proceed further.

Choose Template:
Step 11: Now after clicking “Continue” button you will be presented third step to create a blog that “Choose a template” here you can choose a template for your blog from variety of template click “Preview template” link to preview your blog. If you choose a template from here then also you can change it later.
Step 12: Click “Continue button” and you are done. Your blog has been successfully created.

Step 13: Now click “Start Posting” button to write a first post for your blog. Write a title of post and body of post. You can also format your post by given formatting tools like bold, italic, underline, text color, size, font and alignment of the text then click “Publish” button to publish your first post. If successful message appears then you have successfully post your blog post. Now click “View blog” to view your blog. Happy blogging. If you face any difficulty in doing this you can email me.


To change templet click on layout button and then click on "Pick new templet " button you can choose any of the templet or you can download it from web and upload it.
To upload new teplet first download a new blogger templet in xml form and then go to the "edit html" in layout here you will found upload your own templete click on browse and upload it.
If you face any difficulty in doing this you can email me.

Step by step process of how to create a blog in Blogger

My lots of friend want to create his own blog they think this is difficult, it is as easy as creating your email id and then writing and email so here is step by step process fo how to create a blog in Blogger

Step 1: Start your favorite web browser. I will suggest you mozila firefox which provide some add on which make it more easy to create a blog post and editing and provide facility that is "Open link in new tab on the same and sigle browser like this "Step 2: Type in http://www.blogger.com/ in address bar of your browser.
Step 3: You will be taken to the Blogger’s home page.
Step 4: Scroll down a little bit then page will be shown like following picture.

You can create a blog easily and quickly in Blogger. There are three steps you have to do to create a blog.

Create an account
Name your Blog
Choose a template

Create an account:

Step 5: Now Click at “CREATE YOUR BLOG NOW”.
Step 6: You will be presented a first step to create a blog “Create a Google account”.
Step 7: If you already have a Gmail or Google Groups or Orkut account then first you have to signin by clicking at “Sign in First” link. Then you will be presented Google account signing in page. Sign in to Google account by typing in there your Id and Password.
Please Note : If you don’t have a Google account then skip the step 7.
(Since lots of images makes page heavy and users having slow speed connection faces problem two load it so to see further step by step process click here )